
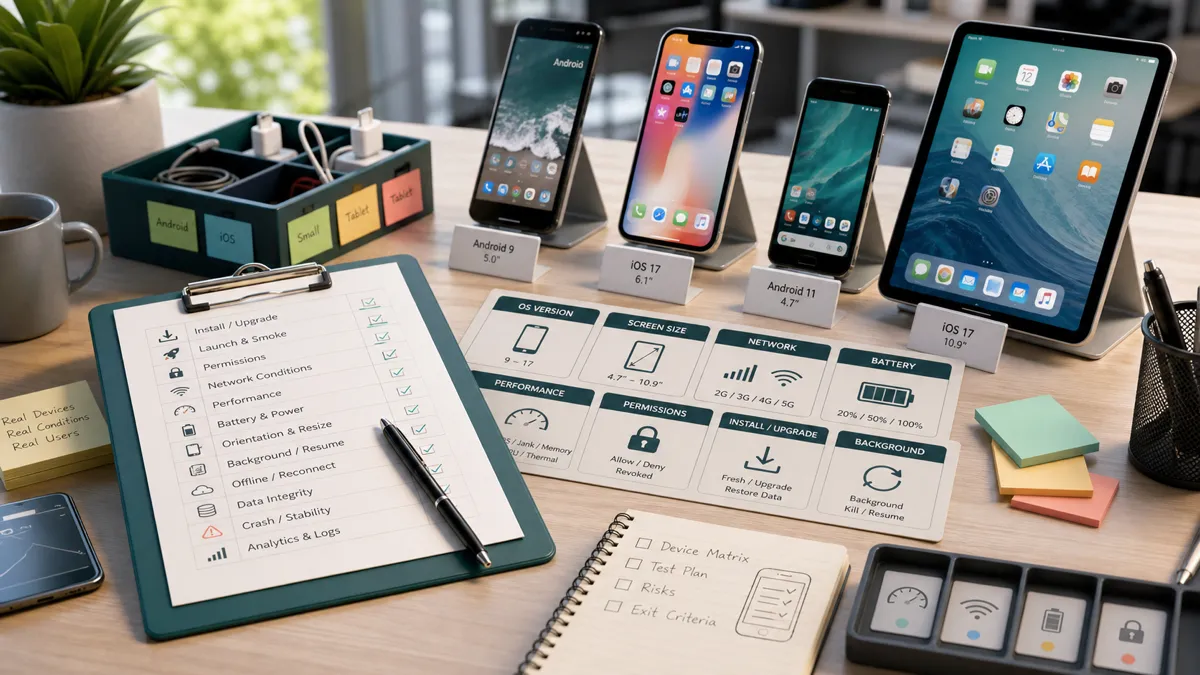
Mobile quality assurance is not web testing on a smaller screen, and treating it that way is how good apps end up with one-star reviews. A web page mostly runs in one place, on a stable connection, in a browser you control. A mobile app runs out in the world, on hardware you have never held, on a train going into a tunnel, with the battery at four percent and three other apps fighting for memory.
Your app has to survive being interrupted constantly. The user switches from Wi-Fi to cellular mid-upload, rotates the phone, denies the camera permission, gets a phone call halfway through checkout, swipes the app away, and reopens it twenty minutes later expecting to pick up where they left off. It also has to pass store review, install cleanly, upgrade without losing data, and behave the same on a three-year-old budget Android as on the newest iPhone on your desk.
So mobile testing earns its own strategy. Test an app like a website and you will pass everything that matters to you and miss everything that matters to your users.
The trap I see teams fall into most is testing the screen and missing the system: the UI looks fine in the simulator, the suite is green, and the part that actually fails, the entitlement, the restore, the experience on a warm phone with a weak signal, never got exercised on real hardware at all. Let me walk through how I approach it, starting with the question that decides how much testing you can realistically do: which devices.
Start here: the fifteen-minute real-device smoke suite
Before any of the strategy below, here is the run I would not ship a mobile release without. You do not need a phone lab and a full-time device wrangler. You need a small, sharp real-device smoke suite covering the flows that would be painful or embarrassing to break, run on a couple of representative devices before every important release and after every risky change. Keep it short enough that running it is never the reason a release slips.
The questions I ask before a mobile release. Run the build through these before the smoke run:
- Does this work on the real device and OS version, not just the simulator?
- What happens on an interrupt: a call, a dropped connection, the app backgrounded mid-action?
- What breaks across the screen sizes and densities the product actually supports?
- Is the build I am testing byte for byte the one that ships?
- And the call only a person can make: does anything look wrong, even when every check is green?
The suite itself is a single, ordered session you can finish in fifteen to twenty minutes per device, on the exact build you intend to ship. Run it in order, because the order is part of the test: the app has to survive a real sequence of events, not a row of checks each run from its own clean slate.
- Fresh install. Delete the app, install the release artifact, and confirm it opens with no leftover state. First-run permission prompts and onboarding only behave correctly from a genuinely clean install.
- Launch from cold. Force-close it, then cold start it. Watch the actual time to first usable screen, not just that it eventually loads.
- Log in, or continue as guest. Both paths if you support both. Confirm the session is real, then kill and reopen the app and confirm you are still logged in.
- One critical flow, end to end. Pick the journey that pays the bills: checkout, booking, the core create-and-save loop. Complete it fully, to the confirmation the user would actually see.
- Background and resume. Send the app to the background mid-flow, open two or three other apps so the operating system feels memory pressure, wait, then come back. Did your state survive? The lifecycle and interrupt guide walks through why this one breaks so often.
- Rotate. Rotate the device in the middle of a form or a loaded list. Watch for lost input, a reset scroll position, or a layout that breaks at the new width.
- Toggle the network. Drop from Wi-Fi to mobile data during an active request, then turn the radios off for a moment and back on. Confirm honest error states and a clean recovery, not a permanent spinner.
- Trigger a real interrupt. Have someone call the device, or fire an alarm or a push notification, mid-task. Confirm the in-progress work survives and you can tap back in where you were.
- Verify the purchase and entitlement. Run a sandbox purchase or restore, then kill and reopen the app and confirm the entitlement is still granted from the backend, not just remembered on the device.
- Capture the evidence. Pull device logs, take screenshots at the key moments, and screen-record anything that felt wrong. On Android, Android Debug Bridge (
adb) gives youadb logcat,adb shell screencap, andadb shell screenrecordstraight from the command line. This is where an agent earns its keep: hand it the log and the recording and it will summarise and cluster, but it could never have produced that recording, because it cannot hold the phone. - Confirm the build number. Read the version and build number off the About screen and write it down next to your result. “It worked” is worthless without “on this exact build”, and this boring detail prevents a fix from being credited to the wrong artifact.
Name each of those as a clear “verify that” check in whatever tracker you use, so a pass or fail is unambiguous and anyone on the team can run the suite the same way you would.
When I shipped Tropic Tumble, this run is why the launch build was safe. A second in-app purchase could silently deliver nothing, and every automated check was green, because the bug only surfaced on a real device on the second tap. Step nine, a sandbox purchase and restore on real hardware, is exactly what caught it. That one bug is why I will not ship without real devices, and the rest of this article is how to choose the devices and what to automate around that run.
For the devices themselves, Firebase Test Lab runs your app on real production devices in Google’s data centres, and Android Device Streaming lets you connect to a remote physical device for manual exploration. Test Lab’s free tier even includes five runs a day on real devices and ten on virtual ones, plenty to wire a smoke run into your pipeline before you commit to a paid plan.
Start with a device and OS risk matrix
You cannot test every device, and you should stop feeling guilty about it. There are thousands of Android models in active use and no team can cover them all. Test the ones that carry the most risk for your specific users, and be deliberate about the rest.
Let the data choose the devices, not the marketing department. Pull these together before you decide anything:
- Your own analytics: which devices and OS versions your real users are actually on
- Your target market, since device mix in Lagos, London, and São Paulo is not the same
- The oldest OS version you have committed to supporting
- Screen sizes and form factors, including tablets and foldables if you support them
- Device performance tiers, because a flagship and a budget phone are different products
- Manufacturer quirks, especially on Android, where Samsung, Xiaomi, and others customise the OS
- Store and platform requirements for the current submission
- Your support history: the devices that generate the most tickets are telling you where the bugs live
That turns into a small, defensible matrix. Here is the shape of one for a consumer app:
| Priority | Device and OS | Why it earns a slot |
|---|---|---|
| P1 | Current iPhone, latest iOS | High-value users, sets the store’s quality bar |
| P1 | Popular mid-range Android, current OS | The realistic device for most of your users |
| P1 | Oldest supported Android OS | Your support boundary, where things quietly break |
| P2 | Small-screen iPhone | Layout and on-screen keyboard pressure |
| P2 | Tablet or foldable, if supported | Different layout, navigation, and multitasking |
| P3 | One previous-generation flagship | Catches regressions on still-common hardware |
You need a device plan that maps to real risk, written down and revisited every quarter as your analytics shift. This matrix is the first piece of a wider mobile test plan; the test strategy builder walks you through the rest.
Fragmentation did not go away, it changed shape
Android fragmentation used to mean one giant pile of thousands of devices. The operating-system spread has actually tightened: Google requires new apps and updates to target a recent Android version to ship on the Play Store, a rolling rule that keeps the version matrix from sprawling. If you are still picturing a hundred different OS versions, you are picturing the wrong problem.
The fragmentation that remains is in the hardware underneath, the part a version number never captures. Two phones on the same Android release can have wildly different memory, chipsets, screen densities, and graphics capabilities. Google’s Reach and devices report in Play Console shows your own users broken out by Android version, memory, chip, and screen, and the device distribution dashboard shows a meaningful slice of active handsets still cannot run the newest graphics features. That is the matrix you actually have to survive, and no emulator preset reproduces it.
Pull your real user distribution, pick a small representative set, and make sure it includes at least one genuinely modest device. The cheap, two-generations-old phone with limited memory is where your worst reviews come from, and it is the one your team never has on their desk.
Emulators, simulators, and real devices each have a job
Simulators and emulators are genuinely useful, and I reach for them constantly. They reset cleanly, run in continuous integration without a phone farm, and give near-instant feedback on layout, navigation, and the hundreds of small iterations you run while a feature is still being built. Anyone who tells you to skip them is wasting your time.
Here is the catch that burns teams. The problem is not that simulators are inaccurate; they are accurate about the wrong machine. An Android emulator borrows your laptop’s processor and graphics card, far more powerful than the chip in a budget handset. Google’s own emulator documentation is explicit that it runs best using your machine’s hardware, “such as the CPU, GPU, and modem,” and that gap hides a whole class of problems.
Animations that glide on your machine stutter on a mid-tier device. Thermal throttling only kicks in on real silicon under sustained load. Manufacturer skins ship rendering quirks and permission dialogs that no stock emulator image reproduces. Performance numbers from an emulator are best-case numbers, not the numbers your users will see.
So split the work by what each tool is honest about. The simulator and the real device disagree precisely where it hurts most.
Use simulators for fast functional iteration during development, real devices for critical user journeys and every release check, and a cloud device farm for the coverage you cannot keep on a desk. If your app leans on anything in that right-hand column, and most apps lean on several, simulator-only confidence is a hypothesis you have not tested yet.
What real mobile teams automate with
A device matrix tells you what to test. The other half of the job, the half nearly every mobile QA posting asks for, is what you automate it with. The tools sort into two camps, and most teams use both.
Cross-platform means one suite that drives iOS and Android together. Appium is the standard, and the single most common requirement on mobile QA job descriptions, because it speaks the WebDriver protocol and runs in almost any language. If your team lives in JavaScript or TypeScript, WebdriverIO is the runner most often paired with it, and the combination I reach for when I want web and native mobile in a single framework. Maestro is the newer, lighter, mobile-only option, still far more common in blog posts than in job specs.
Native means a framework tied to one platform, which buys speed and deeper hooks at the cost of a second suite: Espresso is Google’s in-process Android framework, XCUITest is Apple’s for iOS. Teams that want the fastest, most stable UI tests close to the code write native and accept maintaining two.
| If you need | Reach for | The trade-off |
|---|---|---|
| One suite for iOS and Android | Appium, often with WebdriverIO | Slower than native, but half the maintenance |
| The fastest, most stable native tests | Espresso (Android), XCUITest (iOS) | Two suites, one per platform |
| Quick, low-setup mobile flows | Maestro | Newer, smaller ecosystem, rarely a hiring requirement |
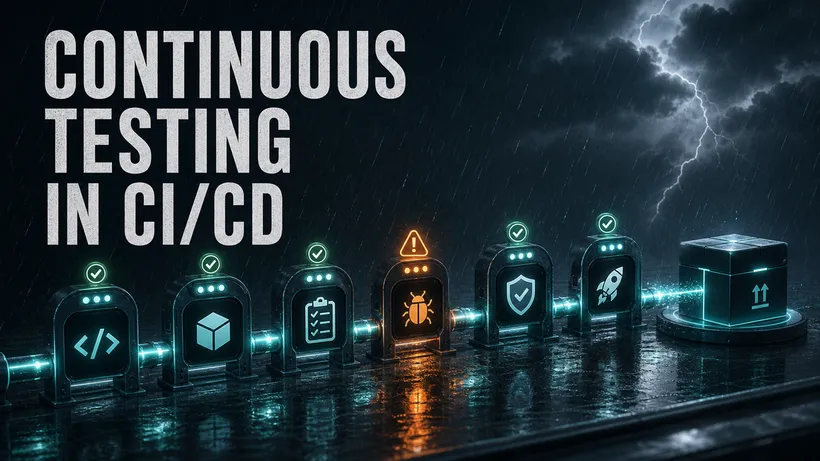
Whichever you pick, the suite has to run on real hardware to mean anything. That is what the device clouds are for: BrowserStack and Sauce Labs are named most often in postings, with AWS Device Farm and Firebase Test Lab close behind. They run your Appium or native suite across real phones in the cloud, so a green build means it passed on devices, not just your laptop’s emulator.
The conditions the app has to survive
A mobile app is constantly interrupted: backgrounded and killed by the operating system, pulled away by a call, dropped onto a dying network, denied the permission a feature depends on. Those conditions are where the most embarrassing mobile bugs live, the cart that vanishes after a background, the double charge on a slow connection, the flow that traps a user who denied a permission and changed their mind. Every one of those transitions has to be exercised on a real device, and the smoke suite further down folds the worst of them into one ordered run.
The app does not own the device’s settings
A whole category of bugs ships because teams only ever test with the device set up the way it shipped. Your app inherits the user’s settings, and real users change them: they crank the font up, switch the phone to another language, fly across time zones, and flip on battery saver. Each of those quietly changes the ground your app runs on.
- Font scale at the largest setting. Set system text size to its maximum and walk your main screens. Watch for clipped labels, overlapping text, and buttons that grow until the one you need is pushed off the bottom of the screen. This is the most common one, and it overlaps with the accessibility pass further down.
- A non-default language. Switch the device language, including a longer language like German and a right-to-left one like Arabic if you support them. Look for half-translated screens, strings that spill out of their containers, and a layout that does not mirror. Then change the language while the app is open, since that is a different code path.
- Time zone and the clock. Anything time-dependent breaks here: an “expires in” countdown, a schedule, a timestamp on a transaction. Change the time zone before and after launch, cross a daylight-saving boundary, and try a device whose clock is simply wrong, the normal state of a phone fresh from a factory reset.
- Battery saver and low-power mode. The operating system throttles the processor and suspends background work. Confirm the app still functions, that scheduled syncs recover when power returns, and that animations degrade rather than freeze.
Storage has the same blind spot. Fill the device until it is nearly out of space and confirm the app warns the user instead of corrupting data or crashing silently. Clear the app’s data from system settings and confirm it rolls back to a clean first-run state, not a broken half-state. If the app backs up to the cloud, restore onto a fresh device and confirm the data comes back intact. None of this shows up on a tester’s tidy, half-empty, English, home-time-zone phone, which is exactly why it ships.
Watch performance, because it is felt, not estimated
Users have almost no patience for an app that crashes, freezes, or takes too long to open. Performance is an experience, and experiences happen on devices in hands. An emulator can tell you a screen “loads,” but not whether the app feels fast when a real user taps a leaderboard and watches a spinner with no sense of progress. That is a product judgement, and QA is unusually well placed to make it.
Both platforms hand you the data you need; read it before and after every release rather than waiting for the reviews to tell you. What I keep an eye on, across platforms:
- Crash-free session and crash-free user rates
- App-not-responding errors, where the UI thread is blocked
- Cold and warm startup time
- Screen and content load time on the critical journeys
- Memory warnings and out-of-memory terminations
- Battery impact and thermal behaviour
- Network payload sizes, since data costs users real money in many markets
- Image loading, a frequent cause of jank and memory spikes
On Android, Android vitals in the Play Console is the source of truth, and Google has put real teeth behind it. An app is flagged for “bad behaviour” if, over a rolling 28-day window, its user-perceived crash rate goes above 1.09 percent or its user-perceived ANR (application not responding) rate goes above 0.47 percent across all devices, with a per-device threshold of 8 percent for either. Cross those lines and Play can reduce your app’s visibility in the store and warn users on your listing.
Those numbers are not aspirational targets. They are the floor that keeps your app discoverable, so treat them as a release gate, not a wish.
On iOS, the equivalents live in the Xcode Organizer, fed by MetricKit. Organizer aggregates real-world crashes, hangs, launch time, memory, and energy from the field, and MetricKit lets you collect the same diagnostics inside your own app for your monitoring. Apple does not publish a public crash-rate threshold the way Google does, but App Store review will reject a build that crashes during testing, and your own crash-free rate is the metric to defend.
Most teams layer a third-party crash and monitoring tool on top, because it reports in near real time and covers both platforms in one place. Firebase Crashlytics is the one you will see most, with Sentry and Instabug common alternatives. Microsoft’s Visual Studio App Center is now retired, so do not build anything new on it.
A quick reference for where these signals come from on each platform:
| Signal | Android | iOS |
|---|---|---|
| Field crash dashboard | ✓ | ✓ |
| Frozen-UI metric | ✓ | ✓ |
| Public store threshold | ✓ | ✗ |
| In-app diagnostics API | ✓ | ✓ |
| Launch-time and energy reports | ✓ | ✓ |
✓ available ✗ not published. Android’s “frozen-UI” metric is ANR; iOS calls it hangs. Both platforms expose an in-app diagnostics API, Android vitals on the device and MetricKit on iOS.
The dashboards tell you what already happened in the field. The dropped frames once the device heats up and the battery drain over a long session only appear after a real device has been working for a while, and they are physically impossible to observe on an emulator running on a cooled laptop with effectively unlimited power. You have to put the work in on the metal.
Where AI helps on mobile, and where the human eye stays non-negotiable
On mobile, the split between what AI does well and what only a person can do is sharper than anywhere else. Where AI does real work for me is reading the trail: a real-device session produces thousands of lines of log in a few minutes, and an agent with the log stream, the steps you took, and a couple of screenshots can:
- summarise a five-minute log window into what actually changed
- separate a backend failure from the user interface symptom it caused
- spot a repeated error code buried in the noise
- cluster performance warnings so you see the pattern, not the individual lines
- compare a before-and-after screenshot and flag what shifted in pixels
- draft a first-pass bug report from the logs and your reproduction steps
That is genuine triage, and the kind of work I happily hand off. The wider case for where AI is strong and where it is not is in QA is the control layer for AI-assisted development; on mobile, the human side of that line is wider than anywhere else.
AI can inspect a screenshot and report that pixels moved between two builds. It still cannot own the release judgement that a screen is right for this user on this device. On mobile that gap is at its widest, across real devices, many screen sizes, and manufacturer skins that shift a layout by a few pixels. I make the full case for choosing the right evidence in AI visual testing.
The division of labour is a strength, not a limitation. Speed without judgment is just faster guessing. If you lean on agents in your workflow, be deliberate about how you review what they produce, so a confident-sounding summary never gets mistaken for verified fact.
Purchases are the clearest case for real hardware
If I had to pick one feature that proves why real devices still matter, it would be in-app purchases. A purchase is not done because the store handed back a success result; that is the very beginning of the chain, and every link after it can fail quietly in a way that takes the user’s money and gives them nothing.
Apple’s local StoreKit testing in Xcode is fast and great for building out your error handling, but its receipts are signed with a different key and will not validate against the real endpoints. The full client-to-server chain, your backend verifying the signed transaction and handling renewal and refund notifications, only runs in the sandbox on a real device. A purchase that succeeds in StoreKit testing but breaks in that chain is one of the most expensive bugs you can ship; it does not just annoy the user, it makes them feel cheated.
Treat the app store as part of your release risk
This is where mobile diverges hardest from the web. Once a bug ships, the cost of fixing it is on a completely different scale:
| Step | Web | Mobile |
|---|---|---|
| Ship the fix | Redeploy, live in minutes | New build through the review queue |
| Reach users | Everyone, on next page load | Only those who update, on a slow tail |
| Stragglers | None, they get the new code | Some never update at all |
A bad release can haunt you for months, because some of those users never update.
Release testing for mobile has to be more thorough than for the web, not less. The web safety net of a quick redeploy is not there to catch you.
There is one trap here that catches even careful teams, and it has nothing to do with device quirks: the build itself. The binary that goes for store review is not the debug build you have been testing all sprint. It is a release build with a different signing key, production endpoints, optimisations turned on, logging stripped out, and sometimes code shrinking that quietly removes something the code depended on at runtime. I have seen a feature work perfectly for an entire cycle and then fail only in the release build, on a real device, because an optimisation pass deleted a class the code looked up by name.
Releases taught me to care about the unglamorous questions before anything ships: what build is this, what environment, what device, what data, and was the fix verified on the artifact that is actually going out? None of that is exciting, and all of it prevents real mistakes. If the exact artifact you are shipping never ran on a real phone, you have not really tested what your users will download.
This is also why mature mobile teams automate the build, signing, and submission with Fastlane on mobile-focused continuous integration like Bitrise or GitHub Actions: a scripted, repeatable pipeline means the artifact you tested is byte for byte the one that ships, instead of a build someone made by hand on a laptop.
Your release pass should cover the upgrade and store-facing surface specifically, not just the feature you shipped:
- Install from the actual build artifact you are submitting, not a debug build
- Upgrade from the previous released version, with real user data present
- First launch after the update, watching for migration and onboarding glitches
- Permissions after the update, since they should not silently reset
- Login and session continuity across the upgrade
- Feature flag defaults for the values that will ship to production
- Store metadata accuracy: the description and screenshots must match what the app does
- Updated privacy disclosures if data collection changed
Keep Apple’s App Review Guidelines close, especially section 2.1 on App Completeness, one of the most common reasons a submission bounces: builds that crash, placeholder content, broken links, or missing information the reviewer needs to use the app. Pay extra attention to payments, subscriptions, privacy, user-generated content, and account deletion, since those carry their own specific rules.
A mobile release checklist you can copy
Here is the checklist I keep open during release week. Adapt it to your product; the categories hold for almost any app:
## Mobile Release QA

### Build
- [ ] Version and build number correct
- [ ] Release notes ready and accurate
- [ ] Feature flag defaults verified for production
- [ ] Clean install and upgrade from previous version tested
- [ ] Release build (not debug) verified on a real device

### Functional
- [ ] Login, logout, and account switch
- [ ] Core user journey end to end
- [ ] Payment or subscription flow, if applicable
- [ ] Push notification entry points route correctly
- [ ] Deep links open the right screen from cold and warm starts

### Device coverage
- [ ] Latest iOS, current iPhone
- [ ] Oldest supported iOS
- [ ] Popular mid-range Android, current OS
- [ ] Oldest supported Android version
- [ ] Small screen and tablet or foldable, if supported

### Conditions
- [ ] Offline and cold start with no network
- [ ] Slow and high-latency network
- [ ] Background and foreground, short and long
- [ ] App killed from recents and relaunched
- [ ] Permissions denied and denied permanently
- [ ] Largest font scale and a non-default language
- [ ] Time zone change, daylight saving, and a wrong device clock
- [ ] Battery saver on, and low free storage
To stop this from being a checklist nobody owns, hang a role and a finish line on the parts that decide whether it gets run at all:
- Owner: QA. Run the real-device smoke suite on the matrix devices, on the exact release artifact. Done when: every step passes on at least the P1 devices, with the build number recorded next to each result.
- Owner: Dev. Script the build, signing, and submission. Done when: the artifact that ships is byte for byte the one QA tested, not a hand-made build.
- Owner: PM. Make the release call. Done when: the unresolved-risks list has been read and someone has signed off on shipping with it.
Make the evidence easy to trust
If agents and automation are doing more of the testing, the handoff matters more, not less. A green checkmark from an opaque process is a claim, not evidence. When work comes to you for sign-off, from a person or an agent, insist on a clean, concrete package, with the honest answer to “what would make us uncomfortable shipping this?” in writing:
| Field | Why it has to be there |
|---|---|
| Exact device and OS version | ”Works on mobile” means nothing; a named device and OS means something |
| App version or build number | So you know what was actually tested, not what was meant to be |
| Reproduction steps | So anyone can rerun it and get the same result |
| Screenshots or video | The visual proof, not a description of the proof |
| Relevant logs | The trail, trimmed to what matters |
| Pass or fail summary | A clear verdict, not a vibe |
| Unresolved risks | The honest list of what is still shaky |
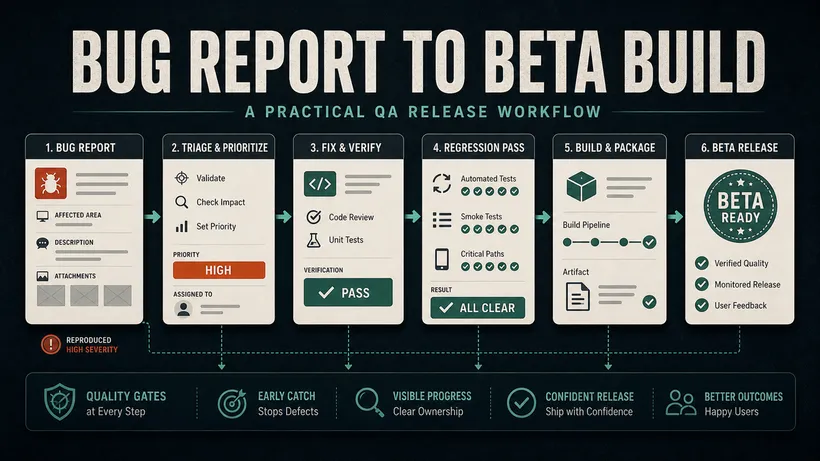
That structure makes approval faster, because there is nothing to chase down, and it makes it harder for an unverified result to slip through looking like a verified one. My bug report template lays out these same fields so nothing important goes missing.
Do not skip accessibility
Mobile accessibility is not a nice-to-have, and in a growing number of markets it is a legal requirement. Both platforms hand you the screen reader, the contrast tools, and the text-scaling controls you need. Work through the basics on real settings, not just a checklist:
- Screen reader labels with VoiceOver on iOS and TalkBack on Android
- Comfortable touch-target sizes: the W3C’s WCAG 2.5.8 Target Size (Minimum) sets a floor of 24 by 24 pixels at level AA, while Apple’s Human Interface Guidelines recommend 44 by 44 points and Google’s Material Design recommends 48 by 48. Aim for the platform numbers.
- Colour contrast, and dynamic text scaling at the largest setting
- A logical focus order without touch, and respect for reduced-motion
Android’s Accessibility Scanner and Xcode’s Accessibility Inspector catch missing labels and contrast on a first pass, but nothing replaces turning the screen reader on and completing your core journey with your eyes closed.
Where I land
Mobile quality assurance comes down to one idea: test the conditions your users live in, not the conditions on your desk. The app will work beautifully for you, on fast Wi-Fi, on the newest phone, with clean test data and every permission granted. That tells you almost nothing about the person on a budget Android, on a patchy connection, who denied location and force-quit the app twice this morning.
The argument was never manual versus automated, and it is not human versus AI now either. The teams who do this well use each for what it is genuinely good at: automation for the repeatable checks, AI for triage and reading the trail, real devices for the truth, and human judgement for the final call, including the visual one no agent can make yet, on whether the experience is good enough to put in front of people.
So test the interruptions, the broken networks, the old OS versions, the denied permissions, and the upgrade path. Watch your crash numbers around every release, and run the real-device smoke suite on the exact build you are shipping. Do that consistently and you stop shipping the bugs you could only have found in the messy real world, which is the only world your users are in. For checklists and templates you can adapt, the downloadable QA resources are a good place to start.

Written by
Julia Pottinger
Hi, I'm Julia. I've been in QA for over a decade. I spend my days testing software and my own time building apps and games, and I write here to share what I learn, the practical, honest lessons you can actually use.
Comments 0
Share your thoughts, ask questions, or add to the conversation.