Adding Tags to Gatsby Blog
July 16, 2020
Tags on a website allows a user to quickly view content that has the same topic. When creating my blog, having tags on my website was on my list as I wanted my users to have a good experience and be able to view related content. I was new to using gatsby and as a result I had to do some work to understand how to implement tags in my blog.
In this blog post I will show you how to add tags to your gatsby blog. This allows users to easily find posts with the same tags, providing a better user experience. This blog assumes that you already have a blog with gatsby. If not you can check out the gatsby starter blog and build on that.
Let’s get started.
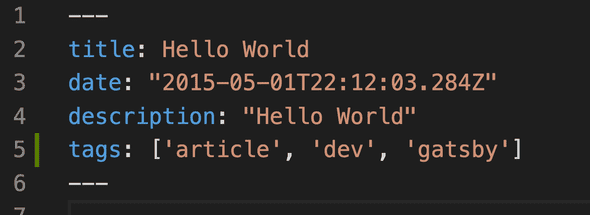
The first thing that you want to do is add the tags to the frontmatter in your markdown file. This is the area at the top of your markdown file that is between dashes.
tags: ['article', 'dev', 'gatsby']Let us then write a query to pick up the new tags that we have added. Gatsby uses graphql and we can utilize it to get data and use it where we want.
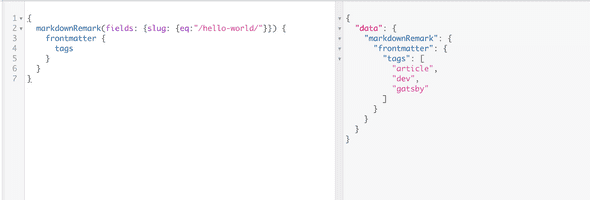
Run gatsby develop to view your blog on your localhost. Then go to GraphiQL http://localhost:8000/___graphql and run the following query.
{
  markdownRemark(fields: {slug: {eq:"/hello-world/"}}) {
    frontmatter {
      tags
    }
  }
}
You should see the tags that you added to the frontmatter of your markdown.
In your src/pages/index/js you are going to add the tags field to the frontmatter of your pageQuery. Your pageQuery should now look like this
query {
    site {
      siteMetadata {
        title
      }
    }
    allMarkdownRemark(sort: { fields: [frontmatter___date], order: DESC }) {
      edges {
        node {
          excerpt
          fields {
            slug
          }
          frontmatter {
            date(formatString: "MMMM DD, YYYY")
            title
            description
            tags
          }
        }
      }
    }
  }
If you run the query in GraphiQL http://localhost:8000/___graphql you will see a list of all the blog posts that you have along with the tags.
We are still not using those tags on the front end yet. So let us add some functionality to do so. Let us create a tag variable.
const tags = node.frontmatter.tagsWe have an array of tags so we need to loop over and display them in a div with space between each tag.
  <div style={{
      display: 'flex',
      flexFlow: 'row wrap',
      alignItems: 'center',
      justifyContent: 'center',
      paddingBottom: '2%',
      fontSize: 12,
      color: 'grey',
      }}
  >
  {tags.map((tag) => {
      return [
          <div
          key={tag}
          variant="outlined"
          // onClick={event => { navigate(`/tag/${tag}`) }}
          style={{
              marginRight: '2.5%',
              marginLeft: '2.5%',
              cursor: 'pointer',
              whiteSpace: 'nowrap'
          }}
          >
              <p>
                  {tag}
              </p>
          </div>
      ]
  })}
</div>
You may notice that we have an onclick commented out. We need to create some functionality that will create a page that displays all the blog posts that have that specific tag.
import { navigate } from "gatsby"Then uncomment
onClick={event => { navigate(`/tag/${tag}`) }}.Your index.js page should have the following code
import React from "react"
import { Link, graphql } from "gatsby"

import Bio from "../components/bio"
import Layout from "../components/layout"
import SEO from "../components/seo"
import { rhythm } from "../utils/typography"

import { navigate } from "gatsby"

const BlogIndex = ({ data, location }) => {
  const siteTitle = data.site.siteMetadata.title
  const posts = data.allMarkdownRemark.edges

  return (
    <Layout location={location} title={siteTitle}>
      <SEO title="All posts" />
      <Bio />
      {posts.map(({ node }) => {
        const title = node.frontmatter.title || node.fields.slug
        const tags = node.frontmatter.tags
        return (
          <article key={node.fields.slug}>
            <header>
              <h3
                style={{
                  marginBottom: rhythm(1 / 4),
                }}
              >
                <Link style={{ boxShadow: `none` }} to={node.fields.slug}>
                  {title}
                </Link>
              </h3>
              <small>{node.frontmatter.date}</small>
            </header>
            <div style={{
              display: 'flex',
              flexFlow: 'row wrap',
              alignItems: 'center',
              justifyContent: 'center',
              paddingBottom: '2%',
              fontSize: 12,
              color: 'grey',
            }}>
              {tags.map((tag) => {
                return [
                  <div
                    key={tag}
                    variant="outlined"
                    onClick={event => { navigate(`/tag/${tag}`) }}
                    style={{
                      marginRight: '2.5%',
                      marginLeft: '2.5%',
                      cursor: 'pointer',
                      whiteSpace: 'nowrap'
                    }}
                  >
                    <p>
                      {tag}
                    </p>
                  </div>
                ]
              })}
            </div>
            <section>
              <p
                dangerouslySetInnerHTML={{
                  __html: node.frontmatter.description || node.excerpt,
                }}
              />
            </section>
          </article>
        )
      })}
    </Layout>
  )
}

export default BlogIndex

export const pageQuery = graphql`
query {
  site {
    siteMetadata {
      title
    }
  }
  allMarkdownRemark(sort: { fields: [frontmatter___date], order: DESC }) {
    edges {
      node {
        excerpt
        fields {
          slug
        }
        frontmatter {
          tags
          date(formatString: "MMMM DD, YYYY")
          title
          description
        }
      }
    }
  }
}
`
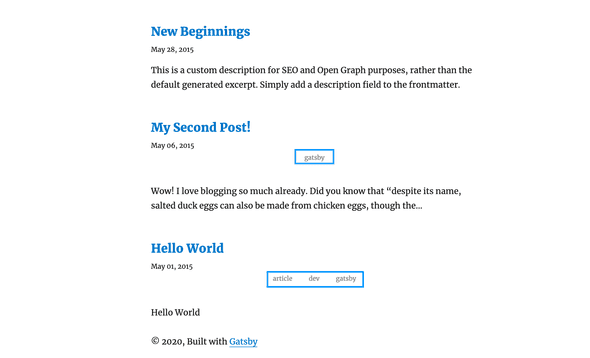
As well as your blog home page should now have the tags being displayed.
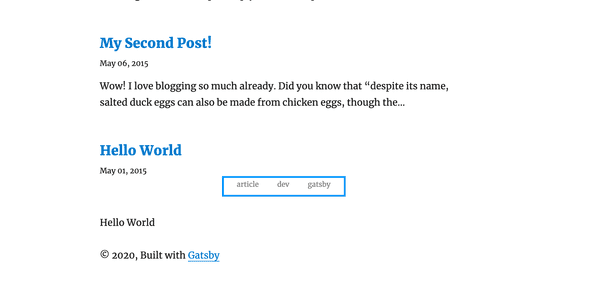
Let us now create a tag pages template. This will generate individual pages for the tags in your posts.
If you take a look in your src/templates folder you will see that you already have a blog-post.js file. To learn more about template files and how to use them you can check out Gatsby’s Tutorial on Adding Markdown Pages.
We are going to create a tags.js file in our src/templates folder. This tag template defines how all pages that is /tag/< page > should look as well as what data should be displayed.
We will first need a query to get all the posts with a specific tag.
Add tags to your other blog posts. Then in GraphiQL http://localhost:8000/___graphql run the following query and you will see a list of all the blog posts that you have with the tag specified.
query{
    allMarkdownRemark(
      limit: 2000
      sort: { fields: [frontmatter___date], order: DESC }
      filter: { frontmatter: { tags: { in: ['gatsby'] } } }
    ) {
      totalCount
      edges {
        node {
            excerpt
          fields {
            slug
          }
          frontmatter {
            title
            description
            date
          }
        }
      }
    }
  }
Once we have gotten back the posts for that specific tag we want to display all of them on a page. We need to define the proptypes that we are looking for. This helps to ensure that we are getting all the data you need in the component.
Tags.propTypes = {
    pageContext: PropTypes.shape({
        tag: PropTypes.string.isRequired,
    }),
    data: PropTypes.shape({
        allMarkdownRemark: PropTypes.shape({
            totalCount: PropTypes.number.isRequired,
            edges: PropTypes.arrayOf(
                PropTypes.shape({
                    node: PropTypes.shape({
                        frontmatter: PropTypes.shape({
                            title: PropTypes.string.isRequired,
                        }),
                        fields: PropTypes.shape({
                            slug: PropTypes.string.isRequired,
                        }),
                    }),
                }).isRequired
            ),
        }),
    }),
}
We will then use the data that we are getting back from the query to display the page.
<div>
    <h1>{tagHeader}</h1>
    <ul>
        {edges.map(({ node }) => {
            const { slug } = node.fields
            const { title } = node.frontmatter
            return (
                <article key={node.fields.slug}>
                    <header>
                        <h3
                            style={{
                                marginBottom: rhythm(1 / 4),
                            }}
                        >
                            <Link style={{ boxShadow: `none` }} to={node.fields.slug}>
                                {title}
                            </Link>
                        </h3>
                    </header>
                    <section>
                        <p
                            dangerouslySetInnerHTML={{
                                __html: node.frontmatter.description || node.excerpt,
                            }}
                        />
                    </section>
                </article>
            )
        })}
    </ul>
</div>
At this point your template/tag.js file should look like this
import React from "react"
import PropTypes from "prop-types"
import { rhythm } from "../utils/typography"
// Components
import { Link, graphql } from "gatsby"
const Tags = ({ pageContext, data }) => {
    const { tag } = pageContext
    const { edges, totalCount } = data.allMarkdownRemark
    const tagHeader = `${totalCount} post${
        totalCount === 1 ? "" : "s"
        } tagged with "${tag}"`
    return (
        <div>
            <h1>{tagHeader}</h1>
            <ul>
                {edges.map(({ node }) => {
                    const { slug } = node.fields
                    const { title } = node.frontmatter
                    return (
                        <article key={node.fields.slug}>
                            <header>
                                <h3
                                    style={{
                                        marginBottom: rhythm(1 / 4),
                                    }}
                                >
                                    <Link style={{ boxShadow: `none` }} to={node.fields.slug}>
                                        {title}
                                    </Link>
                                </h3>
                            </header>
                            <section>
                                <p
                                    dangerouslySetInnerHTML={{
                                        __html: node.frontmatter.description || node.excerpt,
                                    }}
                                />
                            </section>
                        </article>
                    )
                })}
            </ul>
        </div>
    )
}
Tags.propTypes = {
    pageContext: PropTypes.shape({
        tag: PropTypes.string.isRequired,
    }),
    data: PropTypes.shape({
        allMarkdownRemark: PropTypes.shape({
            totalCount: PropTypes.number.isRequired,
            edges: PropTypes.arrayOf(
                PropTypes.shape({
                    node: PropTypes.shape({
                        frontmatter: PropTypes.shape({
                            title: PropTypes.string.isRequired,
                        }),
                        fields: PropTypes.shape({
                            slug: PropTypes.string.isRequired,
                        }),
                    }),
                }).isRequired
            ),
        }),
    }),
}
export default Tags
export const pageQuery = graphql`
  query($tag: String) {
    allMarkdownRemark(
      limit: 2000
      sort: { fields: [frontmatter___date], order: DESC }
      filter: { frontmatter: { tags: { in: [$tag] } } }
    ) {
      totalCount
      edges {
        node {
            excerpt
          fields {
            slug
          }
          frontmatter {
            title
            description
            date
          }
        }
      }
    }
  }
`
Notice that we replaced ‘gatsby’ in the query to a tag variable so that it can be dynamic.
We have one more step to do before we can view our tag pages. We need to use the createPages API that will dynamically generate tag pages in addition to the post pages that we already have. We will do this in our gatsby-node.js file. We will be using graphql queries to get tags as well as using lodash to create slugged paths for our individual tag pages.
You will notice that your gatsby-node.js file already has a createPage function for your blog posts. We are going to be creating something similar for your tag pages.
Update your gatsby-node.js file with the following code.
const path = require(`path`)
const _ = require("lodash")

const { createFilePath } = require(`gatsby-source-filesystem`)

exports.createPages = async ({ graphql, actions }) => {
  const { createPage } = actions

  const blogPost = path.resolve(`./src/templates/blog-post.js`)
  const tagTemplate = path.resolve("./src/templates/tag.js")
  const result = await graphql(
    `
      {
        allMarkdownRemark(
          sort: { fields: [frontmatter___date], order: DESC }
          limit: 1000
        ) {
          edges {
            node {
              fields {
                slug
              }
              frontmatter {
                title
                tags
              }
            }
          }
        }
        tagsGroup: allMarkdownRemark(limit: 2000) {
          group(field: frontmatter___tags) {
            fieldValue
          }
        }
      }
    `
  )

  if (result.errors) {
    throw result.errors
  }

  // Create blog posts pages.
  const posts = result.data.allMarkdownRemark.edges

  posts.forEach((post, index) => {
    const previous = index === posts.length - 1 ? null : posts[index + 1].node
    const next = index === 0 ? null : posts[index - 1].node

    createPage({
      path: post.node.fields.slug,
      component: blogPost,
      context: {
        slug: post.node.fields.slug,
        previous,
        next,
      },
    })
  })

  // Extract tag data from query
  const tags = result.data.tagsGroup.group

  // Make tag pages
  tags.forEach(tag => {
    createPage({
      path: `/tag/${_.kebabCase(tag.fieldValue)}/`,
      component: tagTemplate,
      context: {
        tag: tag.fieldValue,
      },
    })
  })
}

exports.onCreateNode = ({ node, actions, getNode }) => {
  const { createNodeField } = actions

  if (node.internal.type === `MarkdownRemark`) {
    const value = createFilePath({ node, getNode })
    createNodeField({
      name: `slug`,
      node,
      value,
    })
  }
}
Restart and clean your development server.
gatsby clean
gatsby develop
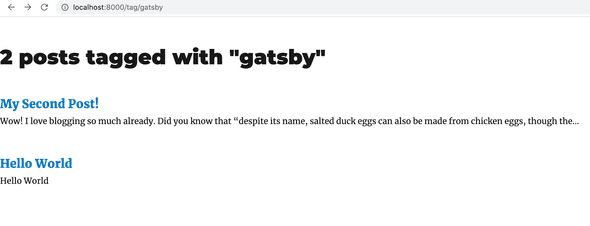
At this point if you go to your http://localhost:8000/ and click on the tag gatsby you should be taken to http://localhost:8000/tag/gatsby where you should see the following:
That is it. We are finished.
To recap
We now have a home page that displays the tags for each blog post.
We also have a tag page that is shown when a specific tag is clicked. This page also shows the total number of blogs that have that tag.
There is so much more that can be done with tags. You can show all tags that you have on your website, as well as use tags to show related posts.
I hope this blog tutorial was helpful and that you have successfully implemented tags in your react gatsby blog site. All the best.
