Deploy React app to Heroku using Gitlab CI/CD Pipeline - test with WebdriverIO
June 16, 2020
Check out the Youtube Tutorial for this blog.
In this tutorial you will learn the following:
- Create React app
- Set up WebdriverIO Tests
- Set up Gitlab repository
- Create Heroku environments and add them to the pipeline
- Connect Heroku and Gitlab
- Create your Gitlab yml file
- Add Gitlab variables
- See your pipeline run and deploy to Heroku
Continuous Integration refers to the development practice where code is integrated into a shared repository and each integration is verified by an automated build and automated tests.
Continuous Delivery is an approach that produces software in short cycles whilst ensuring that the software can be released at any time.
Continuous Deployment is a strategy that allows for software that passes the automated testing phase to be automatically released into production
Gitlab is a source code management tool that also provides CI/CD services.
Heroku is a platform as a service that provides users with the option to deploy, host and manage applications.
WebdriverIO is a browser and mobile automation test framework for Node.js
Create React app
The first thing that we want to do is create our React Application. We can do that by using the create-react-app functionality.npx create-react-app react-deploy-to-heroku-using-gitlab
cd react-deploy-to-heroku-using-gitlabWe can then start up the React project by running
npm startSet up Webdriver Tests
For this tutorial we will be using WebdriverIO and you can check out my tutorial on TestAutomationUniversity - UI Automation with WebdriverIO to learn more.
We are now going to be installing some dependencies that we will need and the first one is WebdriverIO.
We are going to say
npm install webdriverio --save-devand this is going to save it to our devDependencies.
Now that we have installed WebdriverIO, the next thing that we are going to do is to create a wdio config file.
This file will specify the location of the tests, the framework that we want to use, reporters, browsers, general configuration of the project. WebdriverIO is a command line interface that allows us to make this file very easy.
Ensuring that we are in the project root, we are going to say:
npm install @wdio/cliAnd then we’re going to run the command config
./node_modules/.bin/wdio configThis is going to ask us some questions and we’re going to just go through them [selecting from pull down options provided and entering space for the ones we want].
- Where should your test be launched? Local.
- Where’s your automation backend located? In our local machine for this.
- Which framework do you want to use? We want to use Mocha.
- Do you want to run WebDriverIO commands synchronous or asynchronous? We want to run WebdriverIO synchronously.
- Where are your test specs located? For our test specs, we just leave it there for now.
- Which reporter do you want to use? We are going to just use dot and spec so we can say space to select.
- Do you want to add a service to your test setup? We want to add our service. We want to add Selenium standalone. So, we are going to go down to selenium-standalone and click space.
- What is the base url? Let us leave that empty for now.
And then it installs everything for us.
Our wdio config file [wdio.conf.js] is created and it contains everything that we wanted it to — our specs, our browser name, our log level.
The next thing that we are going to do is install Chai.
Chai is going to be the assertion library that we’re going to use. So, we’re going to say:
npm install chai --save-devWe are also going to install Chai WebdriverIO so that further on we can use it to set global assertions.
npm install chai-webdriverio --save-devNOTE
When we say --save it allows it to be saved to our package.json so that whenever we say npm install, if it is that we lose our node_modules folder, or if it is that we are uploading it to our repository, other persons when they’re using the project can just say npm install and all of the packages that we use, which will be stored in our package.json, will be unloaded for them and they will have their own node_modules folder.
And then we’re going to install our local runner.
npm install local-runner --save-devLet us now set chai up in our configuration file so that we can use Chai assertion throughout our project.
We are going to go into our configuration file [wdio.conf.js] and we are going to go to the beforeTest section. Let’s uncomment it.
beforeTest: function () {
        const chai = require('chai')
        const chaiWebdriver = require('chai-webdriverio').default

        chai.use(chaiWebdriver(browser))

        global.assert = chai.assert
        global.should = chai.should
        global.expect = chai.expect
    },
What we are doing is adding the Chai assertions.
We can use assert, we can use expect, we can use should, as the Chai module contains all those three assertions. We’re putting it in the “before” snippet because it will run the containing code before every test, regardless of where the file is stored.
In this case, we’re going to be setting global asserts, global should, and global expect, so that we won’t need to import it in every file.
Let us now create a urls.js file in the root of our project. This will contain the urls that we will be running or test against.
module.exports = {
    local: 'http://localhost:3000/',
    prod: 'https://julia-test-prod.herokuapp.com/',
    qa: 'https://julia-qa.herokuapp.com/'
}
We are then going to set up our WebdriverIO config file to use these environments when we are running our tests. So we go into our config file and at the very top, we are going to import that URL file.
const url = require('./urls')When we specify the environment that we want in our terminal, we need to use something that is going to determine what that URL is going to be.
So, we are going to process the environment variable that we will be passing through our terminal.
const ENV = process.env.ENVprocess.ENV is started at the run time and it is used to represent the state that your test will run in. So, it is going to parse whatever we pass in. So, if we say ENV=qa then it’s going to take QA and map it to the URL that we have specified that QA should be. And that is what it’s going to use, to run our test on.
We are going to say “if you don’t say environment (or the environment variable that is passed in is not one of the ones that we are expecting, that we have specified here, which are qa,local and prod)” then we are going to say console.log and an error message — “Please use the following format when running the test script: ENV=qa|prod|local”.
Then we are going to exit — process.exit() — and this will stop our test.
const url = require('./urls')
const ENV = process.env.ENV

if (!ENV || !['local', 'prod', 'qa'].includes(ENV)) {
    console.log('Please use the following format when running the test script: ENV=qa|prod|local')
    process.exit()
}
We also need to change our baseurl.
baseUrl: url[process.env.ENV]In our package.json file we are going to add a wdioTest script command that will allow us to run our test using the WebdriverIO conf file wdio.conf. "wdioTest": "node ./node_modules/.bin/wdio ./wdio.conf.js"
"scripts": {
    "start": "react-scripts start",
    "build": "react-scripts build",
    "test": "react-scripts test",
    "eject": "react-scripts eject",
    "wdioTest": "node ./node_modules/.bin/wdio ./wdio.conf.js"
  },
Create a folder to hold our tests and a test file called app.test.js
We are going to add a simple test to verify that the Learn React test is showing.
describe('React application home page', () => {
    it("Verify that the app link says Learn React", () => {
        browser.url('/')
        let text = $(".App-link").getText()
        assert.equal(text, 'Learn React')
    })
})
Lastly we are going to update the path of our specs in our wdio.conf.js file.
specs: [
        './test/**/*.js'
    ],
We are going to run our test using the command
ENV=local npm run wdioTestSet up Gitlab repository
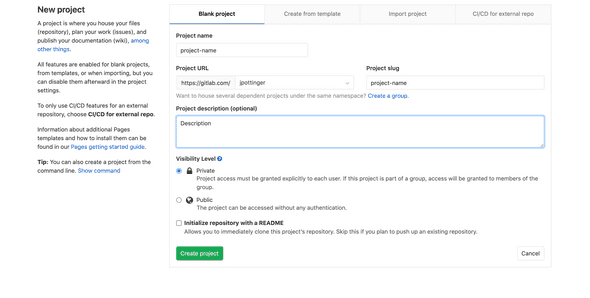
We are now going to create our gitlab repository. Login to Gitlab and click on New Project
Click Clone and copy the Clone with HTTPS url.
In our terminal
git remote add origin <paste the url you just copied>Commit your code and then push to origin master.
git push -u origin masterCreate Heroku environments and add them to the pipeline
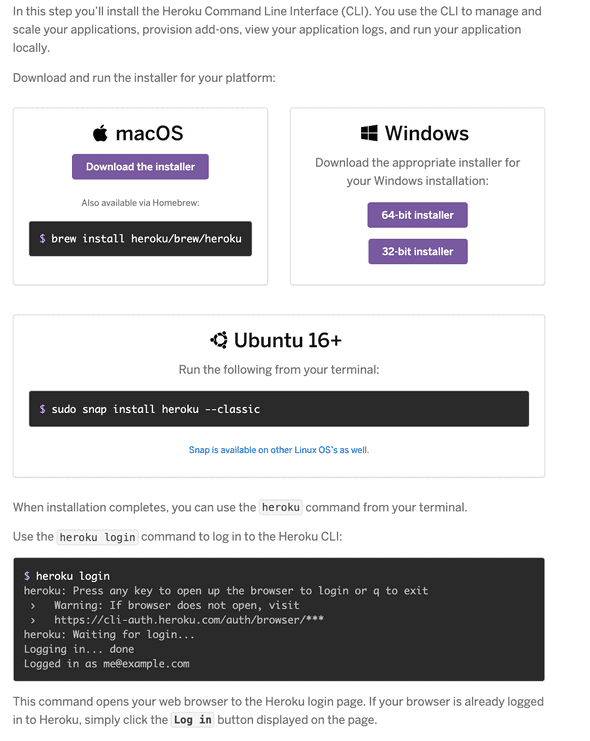
Go to the Heroku Devcenter Node JS SetUp Page and follow the instructions to set up and log in with heroku.
Let us now create the qa environment or url on Heroku.
heroku create julia-qa --buildpack mars/create-react-appWe are using a buildpack when creating our environment/url. A buildpack transforms deployed code into a slug that allows Heroku to execute it. It contains scripts that retrieves dependencies, assets, compiled code among other things. The create-react-app buildpack will always be used when deploying this project. Learn more about buildpacks.
Let us now create the prod environment or url on Heroku.
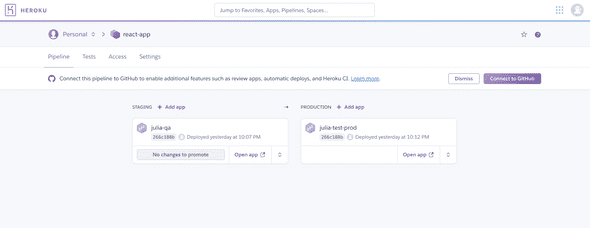
heroku create julia-test-prod --buildpack mars/create-react-appGo to Heroku and add the apps to a pipeline.
Connect Heroku and Gitlab
Let us set up git remote for Heroku.
heroku git:remote -a julia-qaPush to Heroku master what is on your Gitlab repository.
git push heroku masterIf we say heroku open we should see our app open up in the browser.
Let us repeat and do the same thing for prod.
heroku git:remote -a julia-test-prod
git push heroku master
Create your Gitlab yml file
We want to use continuous integration and deployment to release our app to production whenever we make a change and push to master.
Let us create a .gitlab-ci.yml file.
In this file we are going to indicate the stages that we want to run, the docker image that we want the stages to be run on as well as the steps that should be carried out in each stage.
cache:
  paths:
    - node_modules/

stages:
  - init
  - deploy_qa
  - test_qa
  - deploy_prod

init:
  stage: init
  image: node:12.16.1
  script:
    - npm install

deploy_qa:
  image: node:12.16.1
  stage: deploy_qa
  script:
    - git push https://$HEROKU_USER:$HEROKU_API_KEY@git.heroku.com/julia-qa.git HEAD:master
    - echo "Deployed to qa server"
  environment:
    name: qa
    url: https://julia-qa.herokuapp.com/
  only:
    - master

test_qa:
  stage: test_qa
  image: trion/ng-cli-e2e
  script:
    - ENV=qa npm run wdioTest

deploy_production:
  image: node:12.16.1
  stage: deploy_prod
  script:
    - git push https://$HEROKU_USER:$HEROKU_API_KEY@git.heroku.com/julia-test-prod.git HEAD:master
    - echo "Deployed to production server"
  environment:
    name: production
    url: https://julia-test-prod.herokuapp.com/
  only:
    - master
We are using node:12.16.1 docker image to deploy our code and trion/ng-cli-e2e docker image to run our tests. The trion/ng-cli-e2e docker image contains all that we need to run tests in a CI Pipeline.
Add Gitlab variables
We are using two variables $HEROKU_USER and $HEROKU_API_KEY. Set those in Gitlab by going to Settings > CI/CD.Expand Variables and create the two variables.
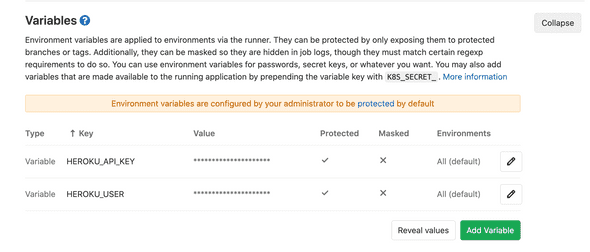
$HEROKU_USER will be heroku and you get the $HEROKU_API_KEY by going to Heroku account and copying the API\KEY.

See your pipeline run and deploy to Heroku
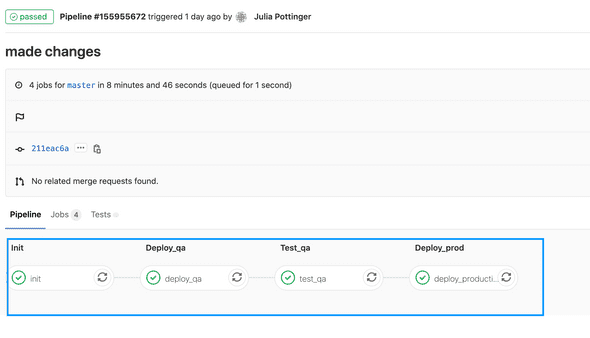
Commit and push the changes that you have made to master. If you then go to gitlab CI/CD > pipeline you should see a job has been triggered.
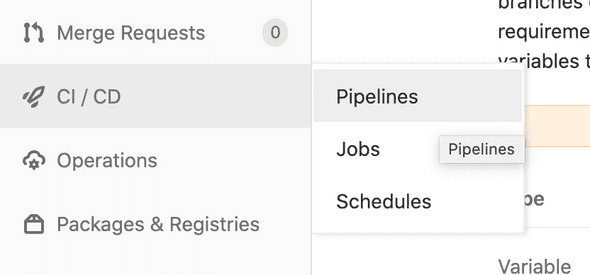
If you click on it you will see the stages that you had specified in your .gitlab-ci.yml file.
If you click on a stage then you will see the logs of what is happening.
If you make any changes to your application and commit to master it will trigger a new pipeline build.
Please note that if any stage of the pipeline fails then it stops and the steps after the failure is not carried out. That is why we deployed to qa and then tested on qa before deploying to prod.
Congrats!! You have successfully deployed your React app to Heroku using the Gitlab CI/CD Pipeline and testing with WebdriverIO before deploying to PROD.
You can find the code here: https://gitlab.com/jpottinger/deploy-react-app-to-heroku-via-gitlab-ci-test-with-webdriverio
Check out the Youtube Tutorial for this blog.

