
Legacy note: this 2020 tutorial uses Gatsby and the older Material UI package names. If you are building this now, check the current MUI App Bar docs and install
@mui/materialinstead of the old@material-ui/*packages.
Having a transparent header or nav bar looks really nice and allows you to display the header image at the top of the page. At least for me, as that was the look I was going for. However, after scrolling I didn’t want to see my blog content behind the header. To solve this issue I implemented a solid header after I had scrolled to a certain view height.
This blog assumes that you already have a blog with gatsby. If not you can check out the Gatsby starter library and build on that.
The first thing that we will do is create our header. I use AppBar from Material UI.
npm install --save @material-ui/core
npm install --save @material-ui/icon
Then we are going to create our appBar.js component
import React from 'react';
import { makeStyles } from '@material-ui/core/styles';
import AppBar from '@material-ui/core/AppBar';
import Toolbar from '@material-ui/core/Toolbar';
import Typography from '@material-ui/core/Typography';
import Button from '@material-ui/core/Button';
import IconButton from '@material-ui/core/IconButton';
import MenuIcon from '@material-ui/icons/Menu';

const useStyles = makeStyles((theme) => ({
    root: {
        flexGrow: 1,
    },
    menuButton: {
        marginRight: theme.spacing(2),
        color: 'black'
    },
    title: {
        flexGrow: 1,
        color: 'black'
    },
    appBarTransparent: {
        backgroundColor: 'rgba(67, 129, 168,0.5)'
    },
    appBarSolid: {
        backgroundColor: 'rgba(67, 129, 168)'
    }
}));

export default function ButtonAppBar() {
    const classes = useStyles();

    return (
        <div className={classes.root}>
            <AppBar position="fixed" className={classes.appBarTransparent}>
                <Toolbar>
                    <IconButton edge="start" className={classes.menuButton} color="inherit" aria-label="menu">
                        <MenuIcon />
                    </IconButton>
                    <Typography variant="h6" className={classes.title}>
                        News
          </Typography>
                    <Button color="black">Login</Button>
                </Toolbar>
            </AppBar>
        </div>
    );
}
We are then going to import it and add it to our layout.js file.
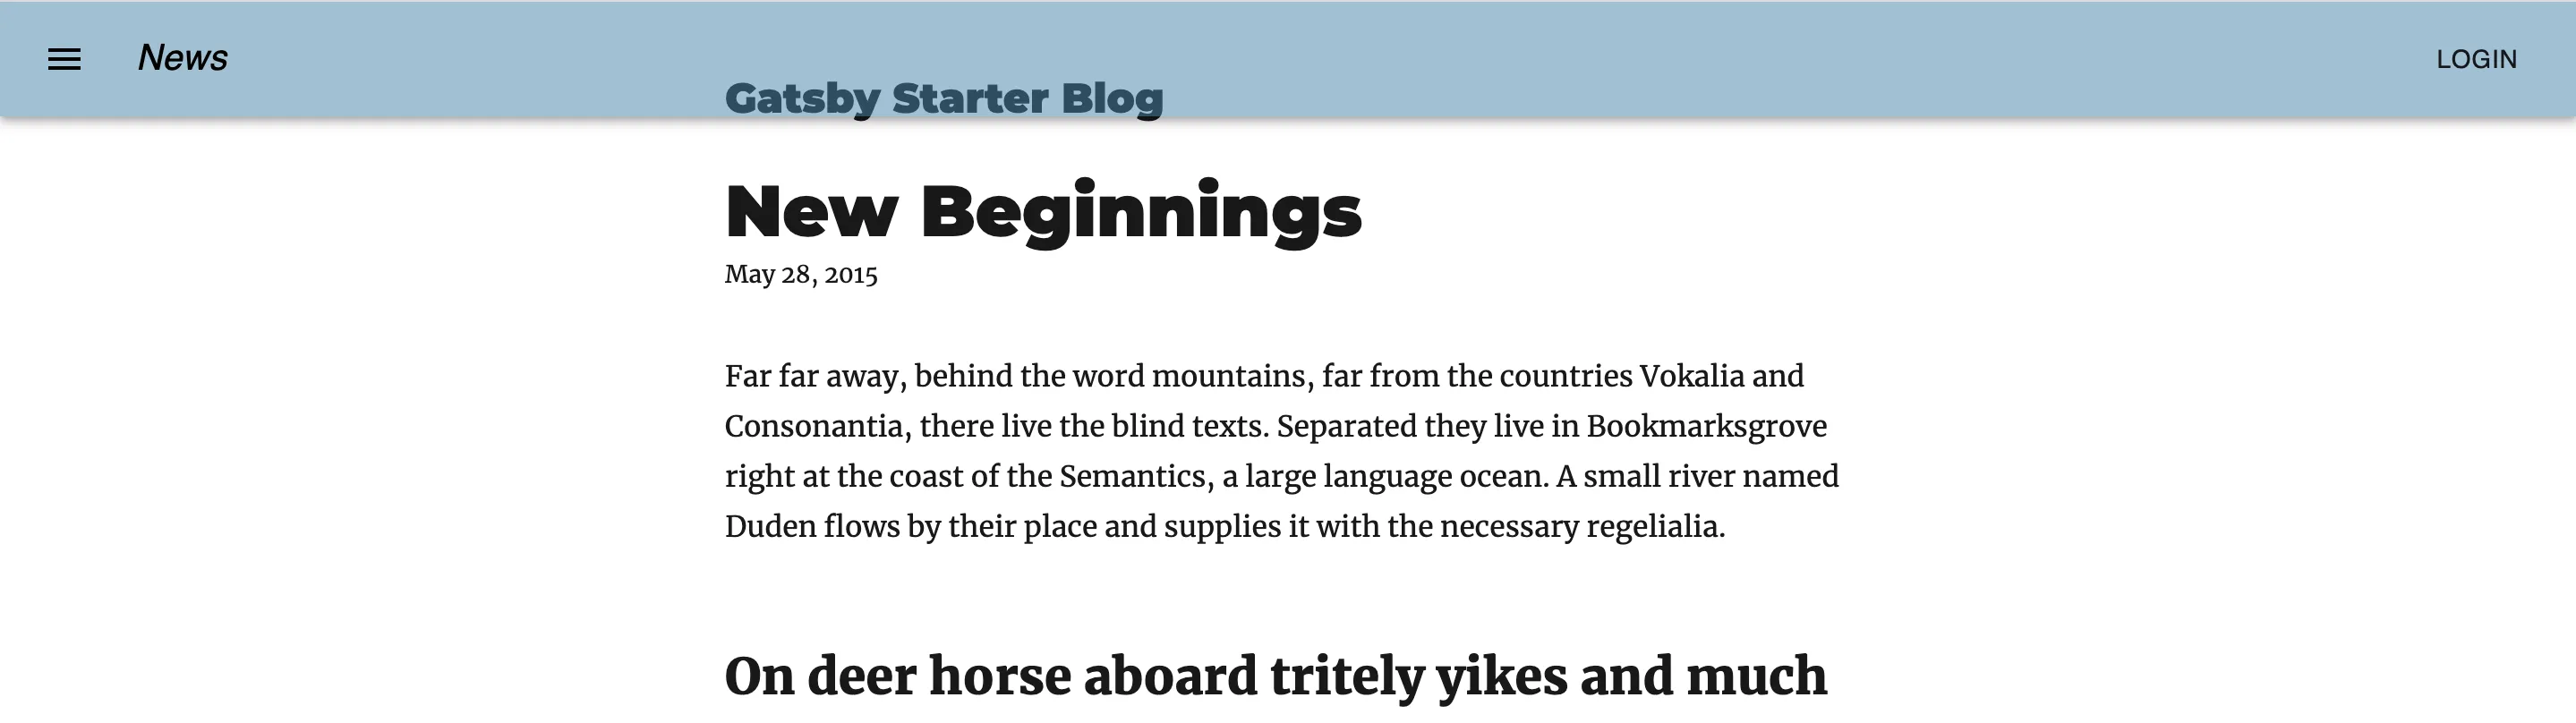
If you load the site by using gatsby develop and going to http://localhost:8000 you will notice that you have a transparent header on your blog post.
Let us now set up the conditions to change the background when we scroll. We will be using React useState and useEffect respectively to manage the state of navBackground and add a scroll listener to the window.
We will be setting the state navBackground to the classname appBarSolid if the window scrolls beyond the viewHeight that we have defined. If it not beyond the view height then the classname will be appBarTransparent.
const [navBackground, setNavBackground] = useState('appBarTransparent')
    const navRef = React.useRef()
    navRef.current = navBackground
    useEffect(() => {
        const handleScroll = () => {
            const show = window.scrollY > 310
            if (show) {
                setNavBackground('appBarSolid')
            } else {
                setNavBackground('appBarTransparent')
            }
        }
        document.addEventListener('scroll', handleScroll)
        return () => {
            document.removeEventListener('scroll', handleScroll)
        }
    }, [])
We will also be using the state to get the classname so that the classname is changed once the scroll view height condition is met.
<AppBar position="fixed" className={classes[navRef.current]}>At this point your appBar.js file should have the following.
import React, { useEffect, useState } from 'react';
import { makeStyles } from '@material-ui/core/styles';
import AppBar from '@material-ui/core/AppBar';
import Toolbar from '@material-ui/core/Toolbar';
import Typography from '@material-ui/core/Typography';
import Button from '@material-ui/core/Button';
import IconButton from '@material-ui/core/IconButton';
import MenuIcon from '@material-ui/icons/Menu';

const useStyles = makeStyles((theme) => ({
    root: {
        flexGrow: 1,
    },
    menuButton: {
        marginRight: theme.spacing(2),
        color: 'black'
    },
    title: {
        flexGrow: 1,
        color: 'black'
    },
    appBarTransparent: {
        backgroundColor: 'rgba(67, 129, 168,0.5)'
    },
    appBarSolid: {
        backgroundColor: 'rgba(67, 129, 168)'
    }
}));

export default function ButtonAppBar() {
    const classes = useStyles();

    const [navBackground, setNavBackground] = useState('appBarTransparent')
    const navRef = React.useRef()
    navRef.current = navBackground
    useEffect(() => {
        const handleScroll = () => {
            const show = window.scrollY > 310
            if (show) {
                setNavBackground('appBarSolid')
            } else {
                setNavBackground('appBarTransparent')
            }
        }
        document.addEventListener('scroll', handleScroll)
        return () => {
            document.removeEventListener('scroll', handleScroll)
        }
    }, [])

    return (
        <div className={classes.root}>
            <AppBar position="fixed" className={classes[navRef.current]}>
                <Toolbar>
                    <IconButton edge="start" className={classes.menuButton} color="inherit" aria-label="menu">
                        <MenuIcon />
                    </IconButton>
                    <Typography variant="h6" className={classes.title}>
                        News
          </Typography>
                    <Button color="black">Login</Button>
                </Toolbar>
            </AppBar>
        </div >
    );
}
Navigate to http://localhost:8000/new-beginnings/ and note that when you scroll the appBar changes to solid and when you scroll back up it changes to transparent.
That is it!! You have successfully implemented a transparent to solid header or nav bar.
You can use the same functionality to trigger other things such as a scroll to the Top Button or remove the header or nav bar completely. All the best.
View the Youtube Video for this tutorial.

Written by
Julia Pottinger
Hi, I'm Julia. I've been in QA for over a decade. I spend my days testing software and my own time building apps and games, and I write here to share what I learn, the practical, honest lessons you can actually use.


Comments 0
Share your thoughts, ask questions, or add to the conversation.